Pure Builders Elastic: Getting started with Python
This is the first in a series of blog posts, where I’ll write about the steps I took in my journey to build a teeny tiny data pipeline using Python, Kubernetes and ElasticSearch.
The idea of the data pipeline I’m creating, is to use Python to export data from the FlashArray and FlashBlade to a log file and then ingest this data into ElasticSearch. In my example, I’ll be collecting volume statistics, such as size, used space and the data reduction numbers per volume.
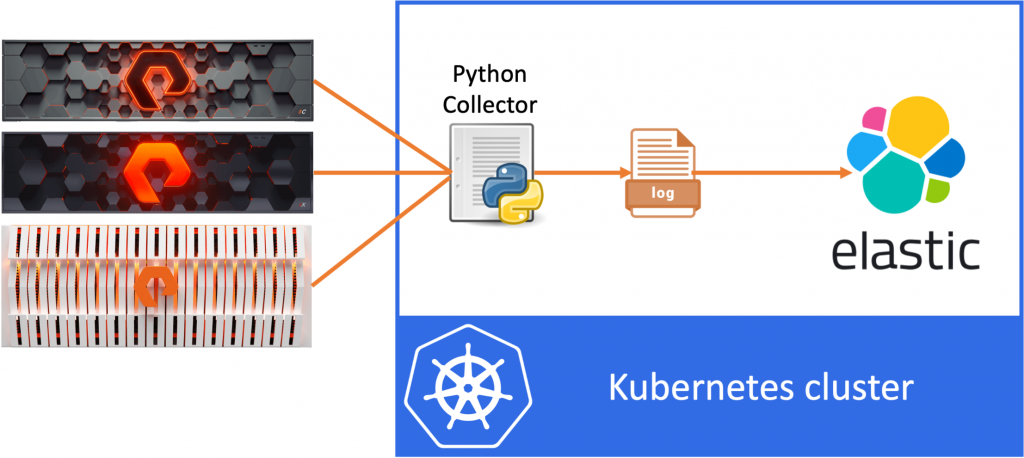
This first post of the series will be about Python, which I’ll be using to write a small collector program. The collector will fetch information from Pure Storage FlashArrays and FlashBlades and write it to a file and to stdout. Later we’ll fetch this data and ship it to ElasticSearch, where we can do analytics and visualisation of the data.
Why Python?

Python has a large community, since it’s a very easy to read programming language. This makes it easy to learn and use and I’d say it’s the number one language being used for data science. However there is also a vast community in other areas of software development. For me the main reasons was that I’ve recently introduced a new project PSO Explorer based on PHP. for which I’m considering to port pieces of the code to Pyhton. Also I’ve been active with Ansible for some time, which is written in Python. I’d like to learn and understand more about data pipelines and enterprise search and finally Pure Storage provides SDKs for Python, allowing easier integration and development.
Getting started on Python
To get started with Python from zero, Udemy offers some nice courses to get you started. Also the Jupiter Notebook, available as part of the Anaconda suite, can be used to get yourself familiar with Python, without having to use terminal, a text editor, etc.
To make it a bit more of a real world example, we’re going to run all parts of the pipeline on Kubernetes.
Building the Python collector
Development environment
For my development I used my local Macbook. This ways I can develop and test my code locally on my laptop, before I move to the next step of containerizing the code.
To install Python on my Mac, I’ll use the Homebrew package manager. This makes it easy to install additional (development) software on my local laptop. Installing Homebrew is done with a simple command launched in Terminal:
/bin/bash -c "$(curl -fsSL https://raw.githubusercontent.com/Homebrew/install/master/install.sh)"
The installation can take a few minutes, since there are a few dependancies that need to be downloaded and installed.
MacOS already comes with Python 2 installed, however since I’m just getting started on Python, why not immediately move to the latest version of Python, version 3? Now that Homebrew is installed, we can install Python 3 with the following command.
brew install python3
Cool, we have Python. Now we can move onto our other dependencies, the Pure Storage SDKs. I’ll be installing those using pip, the package manager for Python. The first step is to make sure we are using the Python 3 version of pip, for which we’ll execute the following:
sudo pip3 install --upgrade pip
To install the Pure Storage SDK’s, execute the following commands.
pip install purestorage
pip install purity_fb
And with that we’re all set, let’s start developing!
Getting volumes from FlashArray
So now we want to get the volumes from our Pure Storage system, I’ll start with FlashArray.
import purestorage

fa = purestorage.FlashArray("10.1.1.10", api_token="d5d5a7a7-d88d-c5c5-a77a-abcef0123456")

for fa_vol in fa.list_volumes(names=["*"], space=True):
    vol = {
            "volname": fa_vol["name"],
            "volsize": fa_vol["size"],
            "volused": fa_vol["total"],
            "voldrr": fa_vol["data_reduction"],
            }
    print(vol)
    pass
Let’s take a look at this first piece of the script. The first thing we do is to import the FlashArray SDK using import purestorage. With that, we can then connect to FlashArray using it’s IP address and the API token. If you need help to get the API token, check out this post, which shows you how to get the API tokens for FlashArray and FlashBlade.
To get the volumes we’ll use the list_volumes API, to see which API endpoints are available check the documentation. In this case I get all volumes and include the Space metrics, since I want to export those to ElasticSearch later on.
By using a for loop, I can iterate through all volumes returned, save the name, size, used space and data reduction values in an array called vol. Finally I print the vol variable to stdout, so that we can view what is returned.
The output is similar to:
{'volname': 'remko_test_vol', 'volsize': 1048576, 'volused': 0, 'voldrr': 1.0}Suppress SSL warnings
The Python script works fine, however, since I don’t have trusted certificates installed on the FlashArray systems I use, I see the following errors:
/opt/anaconda3/lib/python3.8/site-packages/urllib3/connectionpool.py:979: InsecureRequestWarning: Unverified HTTPS request is being made to host '10.1.1.10'. Adding certificate verification is strongly advised. See: https://urllib3.readthedocs.io/en/latest/advanced-usage.html#ssl-warnings
  warnings.warn(
The best way to solve this is to make sure you have trusted SSL certificates installed on your FlashArray. However in my lab, I don’t want to go through the process of replacing the self signed certificates, so I’ll suppress these warning messages.
import purestorage
import urllib3

urllib3.disable_warnings(urllib3.exceptions.InsecureRequestWarning)
...
To suppress the SSL warnings we need to import the urllib3 package, so that we can use the use the urllib3.disable_warnings function to disabled the InsecureRequestWarning warnings. And sure enough if we execute the code again, the warnings are gone.
Great, we now have the correct output we’re looking for to export to ElasticSearch for FlashArray. Now let’s continue with FlashBlade.
Getting FileSystems from FlashBlade
Now that we have volumes for FlashArray, we also want to collect volumes for FlashBlade. The python script for this is very similar, however we now use the purity_fb module to connect to FlashBlade:
import purity_fb
import urllib3

urllib3.disable_warnings(urllib3.exceptions.InsecureRequestWarning)

fb = purity_fb.PurityFb("10.1.1.30", api_token="T-d5d5a7a7-d88d-c5c5-a77a-abcef0123456")

for fb_fs in fb.file_systems.list_file_systems(names=["*"]).items:
    fs = {
            "volname": fb_fs.name,
            "volsize": fb_fs.provisioned,
            "volused": fb_fs.space.virtual,
            "voldrr": fb_fs.space.data_reduction,
            }
    print(fs)
    pass
You can see that the FlashBlade API returns the values in a slightly different way then FlashArray. However most of this is similar to what we did for FlashArray.
Completing the collector
Now that we can list volumes and file systems, I want to combine both FlashArray and FlashBlade in a single program. Also I want to add the option to use multiple FlashArray and FlashBlade systems.
So in the following example, I’ve combined the two scripts in to one. I’ve added two arrays to list all FlashArray and FlashBlade IP addresses and corresponding API tokens. And added a loop to iterate through all FlashArrays and FlashBlades to list all volumes.
import purestorage
import purity_fb
import datetime
import json
import urllib3

urllib3.disable_warnings(urllib3.exceptions.InsecureRequestWarning)

fa_arrays=[
        {"url": "10.1.1.10", "token": "d5d5a7a7-d88d-c5c5-a77a-abcef0123456"},
        {"url": "10.1.1.20", "token": "d5d5a7a7-d88d-c5c5-a77a-abcef0123456"},
    ]
fb_arrays=[
        {"url": "10.1.1.30", "token": "T-d5d5a7a7-d88d-c5c5-a77a-abcef0123456"},
        {"url": "10.1.1.40", "token": "T-d5d5a7a7-d88d-c5c5-a77a-abcef0123456"},
    ]

mytime=datetime.datetime.now().isoformat(timespec='minutes')

for fa_array in fa_arrays:
    fa = purestorage.FlashArray(fa_array["url"], api_token=fa_array["token"])

    for fa_vol in fa.list_volumes(names=["*"], space=True):
        vol = {"date": mytime,
            "array": fa_array["url"],
            "volname": fa_vol["name"],
            "volsize": fa_vol["size"],
            "volused": fa_vol["total"],
            "voldrr": fa_vol["data_reduction"],
            }
        print(json.dumps(vol))
        pass
    pass

for fb_array in fb_arrays:
    fb = purity_fb.PurityFb(fb_array["url"], api_token=fb_array["token"])

    for fb_fs in fb.file_systems.list_file_systems(names=["*"]).items:
        fs = {"date": mytime,
            "array": fb_array["url"],
            "volname": fb_fs.name,
            "volsize": fb_fs.provisioned,
            "volused": fb_fs.space.virtual,
            "voldrr": fb_fs.space.data_reduction,
            }

        print(json.dumps(fs))
        pass
    pass
In addition to the changes mentioned above, I also added a date field and array field to the volume and file system output, so that we can differentiate between the volumes/filesystems from different arrays. And have a timestamp for the export.
Finally I now use the json.dumps function to print the results. This makes it easier to import the data in ElasticSearch later on.
Conclusion
With that we have our first step completed for our data pipeline. We’ve created a (small) Python program that extracts information from our Pure Storage systems and prints it to the console (stdout). The next step will be to put this code in a container, so that we can run it on our Kubernetes cluster.